Recipe : Tiramisu Cupcakes

Wednesday, February 29, 2012

I love tiramisu but always thought it was a bit inconvenient to transport from place to place. After craving it for weeks and weeks, I finally decided to search through my bookmarks to find the tiramisu cupcake recipe I had saved. The first time I made it, an angel food cake base was used. This time around I opted for a different cake base. I followed Martha Stewart's Recipe hoping that she would not steer me wrong. 

Ingredients

  • 1 1/4 cups cake flour (not self-rising), sifted
  • 3/4 teaspoon baking powder
  • 1/2 teaspoon coarse salt
  • 1/4 cup milk
  • 1 vanilla bean, halved lengthwise, seeds scraped and reserved
  • 4 tablespoons (1/2 stick) unsalted butter, room temperature, cut into pieces
  • 3 large whole eggs plus 3 egg yolks, room temperature
  • 1 cup sugar
  • Coffee-Marsala Syrup
  • Mascarpone Frosting
  • Unsweetened cocoa powder, for dusting

Directions

  1. Preheat oven to 325 degrees. Line standard muffin tins with paper liners. Sift together cake flour, baking powder, and salt. Heat milk and vanilla-bean pod and seeds in a small saucepan over medium heat just until bubbles appear around the edge. Remove from heat. Whisk in butter until melted, and let stand 15 minutes. Strain milk mixture through a fine sieve into a bowl, and discard vanilla-bean pod.
  2. With an electric mixer on medium speed, whisk together whole eggs, yolks, and sugar. Set mixing bowl over a pan of simmering water, and whisk by hand until sugar is dissolved and mixture is warm, about 6 minutes. Remove bowl from heat. With an electric mixer on high speed, whisk until mixture is fluffy, pale yellow, and thick enough to hold a ribbon on the surface for several seconds when whisk is lifted.
  3. Gently but thoroughly fold flour mixture into the egg mixture in three batches; stir 1/2 cup batter into the strained milk mixture to thicken, then fold milk mixture into the remaining batter until just combined.
  4. Divide batter evenly among lined cups, filling each three-quarters full. Bake, rotating tins halfway through, until centers are completely set and edges are light golden brown, about 20 minutes. Transfer tins to wire racks to cool completely before removing cupcakes.

Cupcakes straight out of the oven. Notice the poked holes on the tops. 
* For the coffee-marsala syrup, I substituted Kahlua for the Marsala to give it a more authentic tiramisu taste. I also poked holes in the tops of the cupcakes and ladled the coffee syrup over it as opposed to brushing it on. If you are going to do this, I recommend you poke the wholes while the cake is still hot. 

The frosting was quite simple to make as well. I also folded in some Kahlua at the last minute. Be warned...last time I attempted this tiramisu frosting, I added the Kahlua and over mixed the frosting causing the alcohol and mascarpone cheese to have a curdling reaction. I recommend folding it in right before you frost your cupcakes.
Mascarpone frosting with a dash of coffee liqueur.
Frosting piped and a light dusting of cocoa powder later, we have the final product.

Yummm!


The final verdict: The frosting was delicious but the cake part was a bit too dense for my liking. I definitely prefer the angel food cake as a base but if making from scratch it seems wasteful to crack so many eggs just to toss the yolk away. Try this recipe out!! I may just make these again using an angel food cake base once I  figure out a substitute for fresh egg whites. 

-Carmen


Recipe: Healthy Post Grape-Nuts cookies


I remember that episode on Friends when Monica tries to recreate Phoebe's grandmother's cookie recipe who claims to have gotten it from her grandmother, "Nestlay Toulouse". Hahahaha, I love that episode.

ANYway, I was eating my cereal, Post Grape-Nuts and discovered a cookie recipe in the back of the box. The only reason I even bought the cereal was it said FREE COOKIE INSIDE! Which I naturally ate before even opening the cereal packet.

~~~~~


Grape-Nuts Cookie | Prep Time: 10 min | Total Time: 25 min

  • 1/2 cup softened butter
  • 1/2 cup firmly packed dark brown sugar
  • 1/2 cup granulated sugar
  • 3 Tbsp. honey
  • 2 eggs
  • 2 tsp. vanilla
  • 1 tsp. baking soda
  • 1/4 tsp. salt
  • 2 cups rolled oats
  • 1 cup flour
  • 1 cup Post Grape-Nuts cereal
1) Preheat oven to 350 degrees Fahrenheit.
2) Beat butter and sugar in large bowl. Add honey, eggs, and vanilla. Mix well.
3) Add baking soda, salt, rolled oats, flour, and Post Grape-Nuts. Combine until just mixed.
4) Drop rounded tablespoons of dough, 2 inches apart onto lined or greased cookie sheets. Bake for 10-14 minutes or until golden brown.
5) Cool 2-3 minutes; remove from baking sheets. Cool completely on wire racks. Enjoy. Once cooled, store these cookies in an airtight container at room temperature.

Makes 4 dozen cookies or 24 servings. 2 cookies per serving.

~~~~~


I cut the recipe in half since the only person who really eats my stuff is me. I also folded in strawberries and used a little less white sugar. It turned out perfect for me because I don't like foods that are too sweet. Wish I had some applesauce on hand because I prefer that>butter. But it turned out really moist, crunchy, and delicioso! And the best part, it's also pretty healthy (with the exception of the butter). The cookies contain a ton of vitamins and minerals including fiber, protein, zinc, magnesium, iron, etc. 

-Debbie

Making my bookcase more "grown up"

Tuesday, February 28, 2012

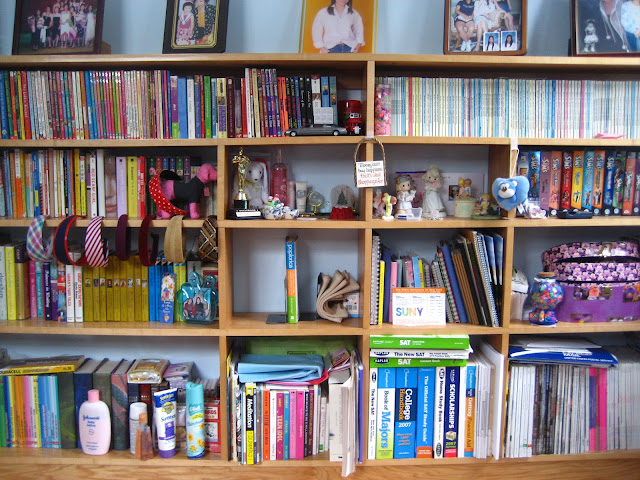
The most untouched/unused place in my bedr00m is my large built-in bookcase. I just don't know what to do with it. Most of its shelves are not tall enough to accommodate certain things, like binders! Or the Harry Potter hardcovers. Even though I didn't move into this room until 2005, the shelves are still filled with colorful childhood books, like Polly Pocket and The Boxcar Children (love them!!!) because they're the only short books that fit.

Unfortunately, I bought some more stuff from TJMaxx when I returned my blanket but if it weren't for that, I wouldn't have been willing to do a big cleaning.


Silver photo frame: $6.99
Black photo frame: $7.99
Potpourri: $6.99 ea
Glass jars: $9.99 ea
Small jar: $5.00

Okay this crap was expensive in total but if it got me to finally clear/dust my bookcase, it was totally worth it!!! And although I bought these a couple of days ago, I've been busy so I put off finishing up the cleaning until today. Which means I've been living in a junkyard for the past two days ha.

Before:

After:
everything just looks better in daylight

I purged a lot of untouched books but there are still some things I'm not ready to part with. I moved the shoe boxes from under my TV to the bookcase as fillers. So now those shelves are empty too. 

I forgot to take a "before" of the front view. But since this was taken Sept. 2007, it's nice to see how it has transformed throughout the years.

2007:
those SAT books give away the age of the picture

2012:

My favorite part is how I didn't really use anything new here. The black frames made a huge difference and I think they contrasted well with the white magazine holders at the bottom ($1.99/5 pack at Ikea). It's not perfect but I think it served the title's mission.


I  really love the edited version of flowers. Now it looks fresh! Fake, but fresh.

-Debbie

Forever21 Haul

Sunday, February 26, 2012


Striped Boatneck Tee
Size Small
Price: $8.80

Essential Cuffed Shorts in Navy
Size X-Small
Price: $12.80
Also wearing American Apparel belt,
American Apparel tights,
Debbie's American Eagle shoes
Essential Cuffed Shorts in Beige
Size X-Small
Price: $12.80
Also wearing American Apparel button up, Zara sweater, F21 belt,
American Apparel tights, Debbie's shoes :)
High-Low Button Up w/Sash
Size Medium
Price: $19.80
Also wearing American Apparel belt,
Essential Cuffed Shorts in Navy (same as above)

Floral Striped Dress
Size Small
Price: $14.50
Also wearing Mom's pearls and Marc Fisher Pumps
Closeup of the fabric of dress
Box Pleated 3/4 Sleeve Dress
Size Small
Price: $18.50
Also wearing American Apparel belt, 
and Marc Fisher Pumps


These are actually not the only things I bought. I got other stuff that were either boring or ugly and which I am planning to return. Well, hope you enjoyed!


-Shirley


Zebra Overload

Tuesday, February 21, 2012

Another lazy day. Woke up, stayed in bed for an hour playing on my phone, then saw Carmen's tweet about having nothing to do. East Sider having nothing to do + East Sider having nothing to do? = FUN ON THE EAST SIDE.

What a relaxing day! We got tea, then wings, then we went to our favorite neighborhood money-sucking store, TJ Maxx. Long story short, I went in with the mission to buy a pair of boots, but somehow, I came out with summer sandals, a ton of other items, and no boots. But! It was also good because if I hadn't bought those items, I would've never cleaned my room. It's really embarrassing but my desk has been unrecognizable since classes started. So these days, cleaning my room means clearing a path from the door to the desk so I could sit at the computer for 6 hours in a row and ignore the wads of tissues in front of me.

Okay...I'm really not that dirty. But it was pretty messy so all of this took a little more than an hour to do, and I threw two bags of garbage out. I always prefer to do a deep cleaning of my room before I start laying out new stuff because I want to see my new items in all its potential glory.


Purchases
Cute sandals - $19.99
Zebra print throw blanket - $12.99
8 x 10 frame - $7.99
5 x 7 frame - $6.99
4 x 6 frame - $4.99
Rocks (yes I bought rocks) - $3.99

The bed is the main focus of most bedrooms. Excited to give my zebra throw a new home, I happily spread my new throw blanket out and... it was awful!!


Okay, the picture is not half bad. Maybe it's just me, but the print spread out in in real life made me really nauseous. I haven't thrown up since I was 8, and I wanted to throw up on the blanket. You can't tell by the photo, but it was glaring. The white was too bright, the black was too saturated, and the pattern was too small for this bed. I also thought it made my bed look really tacky. Against this lighting, it was harsh even when crumpled up. It was like a zebra threw up in my room.

zebra puke


I decided to fold it up and put it over my nice, soft, neutral cream throw. It made a huuuge difference, but can you imagine having 4 layers of blankets and having to make them in this combination every morning? I'm one of those quirky ones who can't leave the house without making their bed. Your mom would love me. Either way, I always strive to create a warm, relaxing bedroom atmosphere and while the throw might work in other people's bedrooms, it just doesn't work in mine. So back to TJ Maxx it will go where it will hopefully find a more appreciative home.

However, I am really happy about my other purchases! I haven't touched the rocks yet as they're going into my bathroom but the frames did my nightstand justice.

photo-less frames with a clock that doesn't have the right time

I love the chrome element of the frames! They complement my alarm clock and offer a contrast to the chalkboard surface of the nightstand. 

Oh, and we also stopped by 16 Handles. Great way to end a girls' night! :)


-Debbie

First Time-ish Congee

Monday, February 20, 2012

Since it’s President’s Day, classes were not in session today. I woke up early afternoon craving pancakes but 10 minutes later and some sniffles (almost done recovering from a week-long cold) confirmed what I really wanted was a bowl of congee.

I’d never bothered learning how to make congee even though it was a breakfast staple growing up. I only made my first and only plain congee last year when I was in the mood for something bland. But this time, I wanted something with more flavor. My dad’s a really good cook and I still like watching him do his thing in the kitchen. One of his culinary tips is to cook the spices/herbs first to bring out the flavor, buttttt I don’t think that’s a secret. For us, that usually means it’s either the scallions, garlic, or ginger. So I used ginger. Why? I don't know, cultural instinct? :)


I sliced about 2 inches and put it in the pot as soon as I turned on the fire so the water had time to soak it in. I also added a few dashes of salt to the water for taste. To save time, I did my prep work while the rice was boiling.


I was too lazy to leave the house so I only worked with what was in the refrigerator. What I have here are baby carrots, cilantro, and because I did not have any scallions, I used onions. As soon as I finished cutting them up, I transferred them all to the pot.


I accidentally put a few pieces into the water too early when I realized it would make my congee very spicy. So I fished most of them out but some of them were still left in there. So even though I didn’t use any oil, there’s oil floating at the top of the pot. Oops. Strained it with a spoon.

As soon as the water started to boil, I took the ginger out and turned the fire down to a simmer. Part of our leftovers from last night was this takeout dish that contained of thin slices of pork and spicy pepper.


A minute into simmering it, I put in the pork and put in a dash of black pepper for taste...even though the takeout was already spicy... Didn’t they say hot and spicy soup is the way to clear up congestion?! At this point, it was starting to look really good and just because I felt like it, I also poured some oyster sauce in. Turns out it really helped temper the spiciness. I let it simmer for about 20 more minutes and realized it would've been so much faster making those pancakes. But this is 10x healthier and better for my stomach.

1 cup of rice, 10 cups of water, and enough for dinner too! How economical!

-Debbie

Related Posts Plugin for WordPress, Blogger...